Photographic progress of gelatin fining

Tue Mar 16, 2010 6:47 pm

The conventional wisdom among some homebrewing circles is that gelatin fining only removes yeast and does nothing for chill haze and protein. I have personally noticed beers getting much clearer after adding gelatin to the keg, even ones that were well flocculated. So I decided to do a small scale test and photograph it daily to see how well the gelatin would work on a hydrometer sample stored in the fridge. Notice I did not say experiment, this lacks a control (sample sitting right next to it that was not treated). I may do a control on the next batch of beer, but the clarifying behavior here is unlike a beer that does not receive gelatin fining, so I am pretty convinced that gelatin is doing the work.

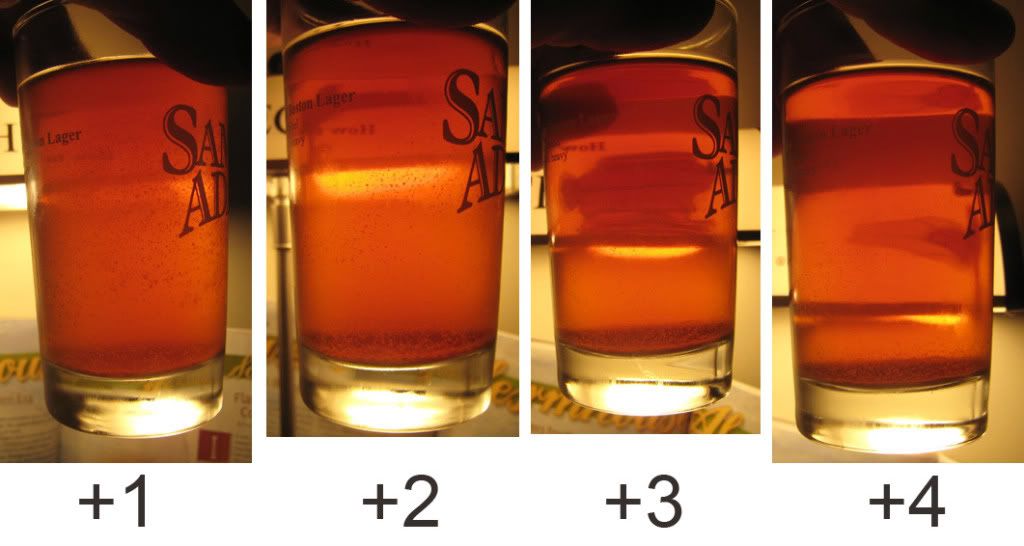
The first picture shows that the beer is fairly clear from the fermenter, no visible yeast but it does have a slight haze. The second picture shows that the beer has developed quite a lot of chill haze. 1 day after adding gelatin you can see large chunks of material precipitating out. This is not typical IME of cold aging, which takes much longer. At no time during cold aging do I see large chunks like this unless it was there before chilling (like hop matter).

Any comments are welcome, please let me know if I've missed something here.

Procedure:
Gelatin fining rate: 0.2g/L
sample size: 4 oz
Photograph untreated sample from the fermenter.
Place in fridge at 38F, photograph when it comes down to temperature.
Portion out 0.025g gelatin and bloom in enough cold water to dissolve for 5 minutes, then microwave to 170°F.
Add gelatin to the sample, photograph daily

Notes:
Since I needed roughly 0.025g of gelatin and the scale only measures to the nearest 0.1g, I had to eyeball the amount a bit. 0.2 g of gelatin was weighed on the scale, then arranged in a long line and cut in half 4 times to get to the desired level. Accuracy here is considerably low and may not be representative of the target 0.2g/L.

Update: Added today's pics. The stuff has settled out to the bottom 1/3 of the glass, kind of hard to tell in the photos. I'm guessing that the rest is going to take quite a while to settle completely out. I don't think I can really show what this truly looks like anymore without a tripod and better lighting setup.

Photos:

From fermenter:
Image
After chilling:
Image
+1 days after gelatin:
Image
+2 days after gelatin:
Image
+3 days after gelatin:
Image
+4 days after gelatin:
Image

We can also get another look by holding the sample up to the light.
Image
Last edited by Nyakavt on Wed Mar 17, 2010 6:04 pm, edited 1 time in total.
User avatar
Nyakavt
 
Posts: 308
Joined: Thu Aug 28, 2008 3:36 am

Re: Photographic progress of gelatin fining

Tue Mar 16, 2010 7:29 pm

Nice pictorial. I never cease to be amazed at how effective a 25cent thing you buy in the baking section can be.
:bnarmy:Corporal, BN Army Kettle Scrubbing Squad :bnarmy:
andy77
 
Posts: 821
Joined: Sun Aug 10, 2008 12:36 pm
Location: Santa Cruz, CA

Re: Photographic progress of gelatin fining

Tue Mar 16, 2010 8:47 pm

I use gelatin in most of my beers as a clearing agent and after Vinnie suggested its as good as filtering im happy too keep doing it.

On the last Vinnie show he discussed quickly how he users gelatin in smaller batches when filtering is not cost effective. He also mentioned that if he could gelatin his big batches he probably would.

Kleiny
User avatar
Kleiny
 
Posts: 10
Joined: Sun Jun 14, 2009 9:19 pm
Location: Victoria, Australia

Return to Kegging, Bottling and Dispensing

Who is online

Users browsing this forum: No registered users

A BIT ABOUT US

The Brewing Network is a multimedia resource for brewers and beer lovers. Since 2005, we have been the leader in craft beer entertainment and information with live beer radio, podcasts, video, events and more.